la.plume CMS Help
This help page assumes you have correctly installed la.plume Micro CMS v10.4. See also troubleshooting | updating to the latest version
To create a new page
(1) Open your password-protected admin page:
http://www.yoursite.com/admin/ or
http://www.yoursite.com/subfolder/admin/
(depending on where you installed the system)
(2) In the "Page filename" box, enter a filename. Don't enter spaces or a file suffix (eg: .html or .php). The filename will be placed into the page's web address, eg: www.mysite.com/my-file. It will also be added to the navigation menu (Capitalized and with any hyphens converted to spaces) as My File linking to the page.
Note! The "Page filename" for the home page must remain index.
(3) In the "Content" box, the first line entered will be the text banner at the top of the page. This can be useful to "label" or categorise the page, to include it in the navigation menu or password-protect it (see below), or for secondary navigation.
The second line entered will become the large heading, eg: "la.plume CMS Help" on this page. This text will also become the page title tag in the head of the дарственная на квартиру, displayed only in the top bar of the browser. Leave the third line blank. Anything entered from the fourth line onwards will be the page content.
Example:
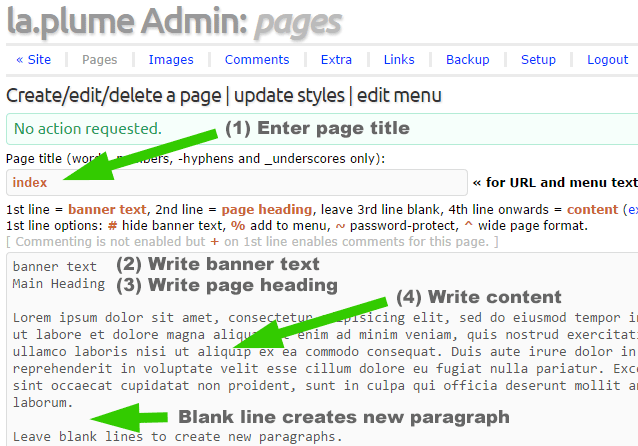
Screenshot: creating a new web page in Admin
(4) Then click the "Create new page" button to create the page. Done!
Formatting text in the "Content" box
When a blank line is entered between sections of text, the correct paragraph tags are auto-inserted into the page's HTML, spacing out the content nicely into visual paragraphs. A single carriage return will insert a line break within a paragraph. You can also enter your own HTML markup. If for example, you create an HTML list, the paragraph tags will not be auto-inserted.
Note! Do not paste into the page anything copied from Microsoft Word. It will probably contain invalid characters that don't display properly in a web browser. If you want to use certain special characters (especially the £ pound sterling symbol) use the correct markup.
To edit an existing page
(1) In the "Page filename" box, enter the filename of the page to be edited. The filenames of all existing pages are listed below the buttons.
(2) Click the "Get page content" button to get the content into the content box.
(3) Edit the content, taking care to preserve the text banner on the first line and the page heading on the second line, then leaving the third line empty.
(4) Click the "Update page" button to save the page.
To delete an existing page
(1) In the "Page filename" box, enter the filename of the page to be deleted. The filenames of all existing pages are listed below the buttons.
(2) Click the "Delete page" button to delete the page.
If you deleted a page by accident, immediately after you did so, the page's filename and content should still be in their respective boxes. To recreate the page, click the "Create new page" button before doing anything else.
The navigation menu
When a page is created it will not automatically be listed in the navigation menu. To list a page in the navigation menu, enter a percent symbol % anywhere in the banner text (the first line in the content box), eg: %mypage. The percent symbol % is just a marker and will not be displayed in the banner. To hide the banner altogether, include a hash symbol # anywhere in the banner text, eg: #hidden banner text. A percent symbol % and hash # can be used in the banner at the same time, eg: #% banner text.
Except for 'home' and 'contact', the navigation menu is listed alphabetically unless you set it to manual in Setup.
More about the navigation menu »
Note! The first line text banner can be made into a horizontal sub-menu by entering hyperlinks. This might be useful, for example, in a particular series of pages which require inter-linking.
Password-protected pages
You can set up a password for pages you want to password-protect. Set up a password in the same way as for admin but with the file /inc/password.php - otherwise the password will be "password" which obviously isn't secure.
Then, if you want a page to be password-protected, enter a tilde symbol ~ anywhere in the banner text, eg: ~banner text. The tilde is just a marker and will not be displayed in the banner. To hide the banner altogether, include a hash symbol # anywhere in the banner text, eg: #hidden banner text. A tilde ~ and hash # can be used in the banner at the same time, eg: #~ banner text.
A hash symbol #, percent symbol % and tilde ~ can be used in the banner at the same time, eg: #%~ banner text. In this example the banner text will not be visible in the page, the page will be listed in the navigation menu, and will be password-protected.
See also lost or forgotten passwords »
Page last modified (Version 7.3 onwards)
The page modification date appears at the bottom of each page by default. If you want to remove it, edit the stylesheet as follows:
#content p.meta {
font-size: 0.75em;
display: none;
}
Adding HTML markup
See also the HTML guide »
To add an image
Assuming the image was uploaded to the default image folder (see [ Upload or delete an image ] at the top of the admin page), the following HTML code can be used to add it to the page, substituting the real image filename:
<img src="img/imagename.jpg" alt="">
Note that the maximum width of an image is 640 pixels. Using the default stylesheet a wider image will be compressed in width.
Alternatively you can simply paste in photos from Flickr by using Flickr's 'Share' then 'Grab the HTML/BBCode' (medium size):

A photo pasted in from Flickr (click to view)
Images can be styled to display in any way you like; you can edit the styles in the stylesheet to add borders, float images left, etc, or you can add styles inline. Restore the original stylesheet with the 'Get default styles' button then clicking 'Edit styles'.
The stylesheet already provides two options for styling images: add border and float left (or both together).
To add a border to an image:
<img src="img/imagename.jpg" alt="" class="border">
To float an image to the left so that text wraps around it:
<img src="img/imagename.jpg" alt="" class="left">
To do both at once:
<img src="img/imagename.jpg" alt="" class="left border">
To add a horizontal rule (line)
<hr>
Add the above HTML code into the page, leaving an empty line above and below.
To colour some text
<span>colour this text</span>
Add the above HTML code into the page, substituting the text to be coloured for "colour this text".
To link to one of your own pages
<a href="./my-page">my link text</a>
Add the above HTML code into the page, substituting your page name for "my-page" and the required link text for "my link text".
To link to an external page
<a href="http://www.example.com/">link text</a>
Add the above HTML code into the page, substituting the real page address for "http://www.example.com/" and the required link text for "link text".
Validating your HTML
Note! Even experienced web designers sometimes break their pages. If you've entered your own HTML markup and see unexpected results (or something looks broken), check for markup errors by entering your page's web address into the W3C Markup Validator.
Including a visitor tracking script
The default file /inc/tracking.php is empty, but you can write your own visitor tracking script into the file.
Additional notes
Image viewer (from version 5.8)
The image viewer allows for wider versions of uploaded images to be viewed in a web page. Links to the web page for each image are in /admin/images.php. The maximum width for images to be viewed in the image viewer is 800 pixels. To password-protect an image, prefix the image filename with ~, eg:
~password-protected.jpg
The password is the same as for password-protected pages.
Social networking / extra content in the sidebar
Two empty 'divs' are provided for manually added content:
/inc/social.php <div id="social">below main content</div>
/inc/extra.php <div id="extra">below navigation menu</div>
(See page structure and how to #extra)
To edit the stylesheet
From Version 9.1 the stylesheet is edited in admin Pages by "Select a theme" and selecting "Current styles". "Get styles" then loads the current stylesheet into the edit box where you can edit and save with "Update styles".
Default styles, 'All White' styles and 'Zest' styles can also be selected. Use any of those themes with "Get styles" and "Update styles". Whichever was selected and saved / updated becomes the current styles, further editable as described above.
See also the stylesheets »
In versions older than Version 9.1:
(1) Click the "Get current styles" button to display the stylesheet.
(2) Edit as required then click the "Update styles" button twice.
To restore the original 'default' stylesheet click the "Get default styles" button and click the "Update styles" button twice (the default stylesheet is preserved and cannot be edited).
Foreign characters
From mid-February 2013 the default font for the public pages is Open Sans, a (free) Google web font. Latin and Latin Extended characters are supported. To use the full range of Cyrillic, Cyrillic Extended, Greek, or Greek Extended characters you may need to edit the first line of the stylesheet to include additional sets. The following example specifies a wider range of character sets (to reduce load time, exclude those not required):
@import url(http://fonts.googleapis.com/css?family=Open+Sans:400,600,400italic,600italic&subset=latin,latin-ext,cyrillic,cyrillic-ext,greek,greek-ext);
(See also language)
Comments
There doesn't seem to be any way to log out from the admin page.
True, there isn't, but there is no need to [but see below].
Patrick, this little CMS is excellent, thank you for making it open source.
It might be worth changing the linking to an 'internal' page example you give above:
<a href="/my-page">my link text</a>
to
<a href="./my-page">my link text</a>
and pointing out that any preceeding hyphen for 'non-menu' pages is required...
<a href="./-my-hidden-page">my link text</a>
Cheers
Paul
That's an interesting comment. Thanks Paul. I assume you are suggesting the leading dot to take account of when the CMS is installed in a subfolder.
Yes, I usually test in subdirectories to keep things tidy and avoid mixing things up!
Now possible to logout from admin (as from 6th January 2013).
Patrick
Hey, I've surely got to state, I really like your website. The colours, the format, the entire theme, they all move perfectly together. Anyhow, that is all I truly had to declare.
How do I reset my password?
Repeat step (2) of the installation, uploading password.php again.
Comments are not working on my installation. The comments file stays always empty.
Comments do not appear automatically with the comment form. They should come in an email. Then enter approved comments in admin with 'Edit Comments'.
Are you serious?
Yes. Moderation prevents spam and meaningless 'test' comments.
Patrick
How do you set the password for password-protected pages? It is obviously not the admin password but I can't find in the documentation where you set the password?
It's exactly the same process as setting up the admin password except you do it with file /cms/inc/password.php instead of the admin folder version. You can set the same password as admin or a different one. Either way, this password has to be entered each time a password protected page is viewed (unlike admin where you login and can stay logged in).
Once you have set the password up for password-protected pages you protect a page by entering a tilde symbol ~ anywhere in the banner text.
I'll try to clarify this on here somewhere.
Patrick
hello patrick how make new theme
Hello rafi. You need to create a new CSS stylesheet (for the new theme). Paste it over 'Current styles' in page admin then 'Update styles'. It becomes the .css file named stylesheet.css that controls the look of the website.
Dear Patrick,
This just has to be the most elegant and easy to use website script ever.
Marc (Jameson)
That's encouraging! Thanks Marc.
Patrick